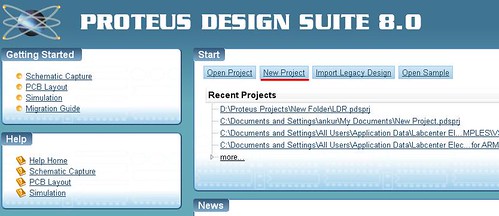
Proteus 8 is a single application with many service modules offering
different functionality such as PCB layout, Schematic capture, and
source code with Virtual simulation. Version 8 is different from its
previous version in terms of application framework, common database
which allows to run schematic capture and PCB layout with common
database and in synchronized way.
- Installation of Proteus 8 is similar to other software and no registration or key is required.

3. The Next step is to select the Schematic layout from the categories and 'Default' will be A4 size. You can select the other layout from the list provided.

4. In next step, you can also create PCB layout in the next step by selecting it and choosing the required layout. You can also select 'Do not create PCB layout' option, if you don't want any PCB design of your schematic circuit.

5. Now, you have to choose the installed compiler and the microcontroller you are going to use. The compiler will allow you to write the code and directly execute it without uploading the hex file as we used to do in previous version.


Now, you can see the three tabs:- Schematic capture, PCB layout, and Source code.
You will also find the pre-selection of microcontroller in Schematic capture window and header file selected in Source code window. All the work can be done in Proteus 8 application software.

Installing the Proteus 8 ISIS:
- You can download the Demonstration version of Proteus 8 ISIS from http://labcenter.com and many tutorial videos are also provided for free. This demo version has been limited as it does not allow to save the file. So, you can simulate and work like professional in demo version but, can not save the file.- Installation of Proteus 8 is similar to other software and no registration or key is required.
Getting started with Proteus 8:
1.
Click on the desktop icon of Proteus 8 and Open the Home page of
Proteus 8. It will be different from its previous version which used to
open up directly the schematic layout.

2.
Now, click on "New Project" option and then, a pop-up window will be
opened up in which you have to name the project and choose the directory
to save the project. It will be saved automatically with ".pdsprj" extension.

3. The Next step is to select the Schematic layout from the categories and 'Default' will be A4 size. You can select the other layout from the list provided.

4. In next step, you can also create PCB layout in the next step by selecting it and choosing the required layout. You can also select 'Do not create PCB layout' option, if you don't want any PCB design of your schematic circuit.

5. Now, you have to choose the installed compiler and the microcontroller you are going to use. The compiler will allow you to write the code and directly execute it without uploading the hex file as we used to do in previous version.


Now, you can see the three tabs:- Schematic capture, PCB layout, and Source code.
You will also find the pre-selection of microcontroller in Schematic capture window and header file selected in Source code window. All the work can be done in Proteus 8 application software.

Getting Started With Proteus 8 Software >>>>> Download Now
ReplyDelete>>>>> Download Full
Getting Started With Proteus 8 Software >>>>> Download LINK
>>>>> Download Now
Getting Started With Proteus 8 Software >>>>> Download Full
>>>>> Download LINK PW
Proteus 8.13 Professional Crack contains an asset program symbol tab where you can make changes at first to every administrator that is important for the envelope project. With everything taken into account Proteus Professional 8.6 SP2 + Convenient is a helpful framework that can be utilized to rapidly foster routine discussions.
ReplyDeletehttps://9xcrack.com/proteus-professional-crack/